Tuesday, November 26, 2013

Postcard Art - SilvaCynthia Chi-City

Throughout the project I wasn't sure what I wanted, I just knew I wanted to involve Chicago. I painted the background red to represent both the violence and passion in Chicago. Many people think Chicago is full of violence, which it is, but there's a lot of passionate people here as well. That's why I included the words in "tagging letter" to represent how these letters are connected both to the tagging crew and gangs here in Chicago; but also many people around the city use this type of art to express themselves and art. There's a black slash in the card to split the city almost, the smaller side is darker which represents the violence in Chicago and the bigger brighter side to represent the passion good and hope in Chicago still. I put Chi-city instead of Chicago because to think it represents it better and myself.

Postcard Art - Moises Perez - Symphony Over the Sunset

While working on this postcard, I knew that I wanted to make something different. Something darker. With a limited selection of inks available for me to use, I used the plentiful black to turn my background into a complete void. I knew that the tape transfers would be difficult to see against the darkness, however, and proceeded to utilize a watercolor orange, splashing it upon the darkness in an attempt to make something akin to a mono-color aurora against a night sky. I further accentuated the transition of orange to black with a red perma-marker. I soon discovered this to be a mistake, since the red now stands out a lot, through the tape transfer.
I felt the primary tape transfer to be an indication of the cityscape of where I'm from. The building reminded me of the Chicago theater in the mid-twentieth century, which the black and white effect furthered. I knew it needed to be the subject of my postcard. It felt bad defacing the striking image for the purpose of this tape transfer, but I knew it was necessary. The individuals on the left and right are supposed to symbolize the audience of the symphony, looking upon performance.
All of my photo sources, alongside the dark background, do not mix well together in my opinion. It's dark enough to symbolize the bustling nightlife of the time, but too dark to really tell what's going on.

Monday, November 25, 2013

Postcard Art - Ricardo Bravo - Dragon-Eize

Ricardo Bravo: Dragon-Eize

Postcard Art - Diaz Emelin - Sea Fishes


First I grabbed some magazine, and look for pictures that I thought were interesting. As I flip to the magazines I cut a picture of  Fishes, Eye, And a skyline. Then I  grabbed tape and grabbed my picture of the fishes and I grabbed the tape and put it on top of the picture until it was all covered by the tape I went to the same process for the other two pictures I had then I grabbed a bucket i filled it up with hot water then I grabbed a stick and started to burnish the paper for about 3 min then  I put it in the bucket so it could soak in the  hot water  I did the same process for the other two then I grabbed one picture and took it out and started to take the paper away with my hands by rubbing it. Then I my image was transparent.Then I grabbed the Note card and did a design as the sea I cut my fishes and glue them in the note card then I just colored them with markers.

What I learned by Developing my Craft is how to transferred the image into the tape and get the same exact image.

I Created a unity with my transfer and my image background by trying to make my image like the sea with the bubbles and the fishes swimming. I also tried to make my fishes colorful so they can stand up. Then I also made the bubbles go over my fishes so I can make it seem like the bubbles are going pass the fishes.

Postcard Art - Akeelah Brown- perfect imperfections


Postcard Art - Marcus Haskins


Postcard Art - Rebeca delaTorre- "Music Takes me Home"

Rebeca delaTorre- "Music Takes me Home"


As I was working on this, I used to the media to explore ideas. I kept on running into a lot of cool things, but I somehow kept coming back to music. Maybe its because its always been such a huge passion of mine. I wanted to incorporate it in my postcard, so that is what I ended up doing. Throughout the process, I have to admit, I did get frustrated. That was only because I had chosen a good quality magazine to work with. So yes, I was frustrated at a certain point, but in the end, it was all worth it. For the finished piece, I was a little disappointed only because I knew that I could have done a better job at planning it. However, it doesn't mean I totally hate it. I still like it very much, but I know that I was capable of a much better job. Then again, this was my first time doing a tape transfer so I still have much to learn. I hope to continue to work with tape transfers. Its one of the coolest things I've done when it comes to art.

Postcard Art - Juan Ramirez "Assassin"


To create my piece I first started looking through different magazines searching for pictures I liked or caught my attention. After cutting out the images I placed tape over my pictures and dipped them into water, soaking the images for a few minutes. When I retrieved  my images from the bucket of water I started to peel off the picture from the tape. The image stayed on the tape so I got a plain white card and started adding designs and color to it. After I got my card the way I wanted it I added my images and made my card the way I liked it to look. I learned many new things that I liked about this project, especially seeing how the image stayed on the tape even after taking off the paper. How I created unity with my background and images is that I used dark colors and a dark theme to blend in with the picture of an assassin.

Postcard Art - Jonathan Mendiola "Exit Through The Colors"


Postcard Art - Gerardo DeLuna Jr."The Lost Farm"

Postcard Art - Karina Nicole Arciga "Finding Superman"

My piece is “Finding Superman”. This was a brand new type of art work for me to learn. I have never done this before but it was really cool to do. Though, it was hard, I learned how to be patient with the Tape Transfers. At first I was really frustrated when I was taping, trying to soak the picture, and trying to rub off the left over paper in the back of the tape transfer. That got me really impatient and mad. Some of the materials I used were 3 new pictures, tape, warm water, air bubble stick, and a bucket. First I cut out three pictures I really liked. It didn’t have to be related to the other pictures it’s just what you liked. Then, I put take over my pictures I cut out. Next, I burnished them, that’s when you sort of take out the air bubbles. After I burnished the pictures, I placed them in a warm bucket of water to soak in. After I let the pictures soak for a while, I rub away the paper in the back with my finger gently. I had to make sure I didn’t rub so hard or so much because then I would rub away the picture that was left.
            This was a new experience for me. I really enjoyed doing tape transfers because it’s different than just painting or drawing but it was really difficult for me to rub away the back of the picture and to soak the pictures for a while. This project really taught me to be patient and to give up so easy. It was hard at first but with practice it got a little better.

Friday, November 22, 2013

Postcard Art - Adriana Gomez: " The Invisible Dragon"


Postcard Art - Ramon Zaragoza: LIve Fast Die Young


I used water, tape, newspaper, sticks, and scissors. First, I picked the newspaper I was going to cut. I cut them and then taped them. Then I dipped it in bucket water. After, I rubbed the paper off. My fingers felt soft and my index finger was sore after a while because I rubbed it so much. I learned that you need to be precise and patient.
            I cut one half of the car off. Then I tried and drew the other half  trying to make it look the same. I also colored the background grayish so it can match the other sides color. There was a couple different medias u used. I used paintbrushes with the water colors, color pencils, and acrylic paint too. I was frustrated somewhat because the color was hard to get on some parts.

Postcard Art - Johnathan Yanez:Geico 15 minutes can Safe you 15 %

 In this project I used  water, tape, newspaper, sticks, and scissors. First, I picked the newspaper I was going to cut. I cut them and then taped them. And I gave a popsicle  stick and I rubbed over it so it would stay together. Then I dipped it in a bucket of water. After, I rubbed the paper with my finger and I took the off the wet paper  and let the ink stay there . My fingers felt soft and my index finger was sore after a while because I rubbed it so much. My hand stared hurting a lot form my elbow I learned that you need to be precise and patient. And take your time doing this art project  
            I colored the background green so it could seen that he's in the forest. A lot of green and also blue so it would mach with the picture There was a couple different media I used. I used paintbrushes with the water colors, color pencils, and acrylic paint too. I was frustrated somewhat because the color was hard to get on some parts.

Postcard Art - Gabriela Medina - A Picture is Worth a Thousand Words

   First, I chose the picture then put the tape over it. Next, I flattened the picture onto the tape with the popsicle stick. Then, dip the picture into the water and let it soak for as long as it needs to. After, I took the picture out and rub my finger against the back to remove the paper from the tape. Once I finished, the photograph remained on the tape; making the take transfer.
   I learned that you must be patient with the picture while it soaks. Your creativity helps develop your artwork. Its a piece that I got to work with on my own and do whatever I want with it. I thought of when I take a picture, you could be taking it of anything yet you can make something more of it. I put all of these different colors and figures to show that pictures create a whole different image then what you really see. I really wanted the flash to stand out the most because that gives pictures their brightness. 

Postcard Art - Jennifer Martinez: Ancient

First, I looked at magazines and picked out several pictures. I cut them out and put tape all over the picture side. Next, we burnished the pictures. Then I filled a bucket with warm water. I put the taped pictures in there and let them soak. After like 20 or 15 minutes I took one of them out. I turned the picture so the taped side was on the bottom. I started rubbing off the paper so only the image would stay on the tape. Once in a while I had to wet it a bit so the paper wouldn't get dry. I did the same for all of the pictures I had taped. I then had to paint a note card to use it as the background for our images. Once that was done we picked the transfers that I wanted to use on the note card. After i had glued the pictures I had to make the images connect with the background.

I learned how to transfer a picture on to tape. Another I learned was how to make the background connect with the actual images. I did the connection by doing the squiggly lines. I think that helped out the pictures a lot. In the beginning I had only colored it with a light brown color pencil. It didn't really look like it went together so that's what made me decide to use a marker instead. Now it looks a bit better.

Altered Transfer Postcards

Guerrilla Students created mailable art! Art can be interactive and communicative. The post is a great way to communicate. Sending art out into the community is a big goal of ours. Mailing art is an awesome way to achieve that. This is Postcard Art.

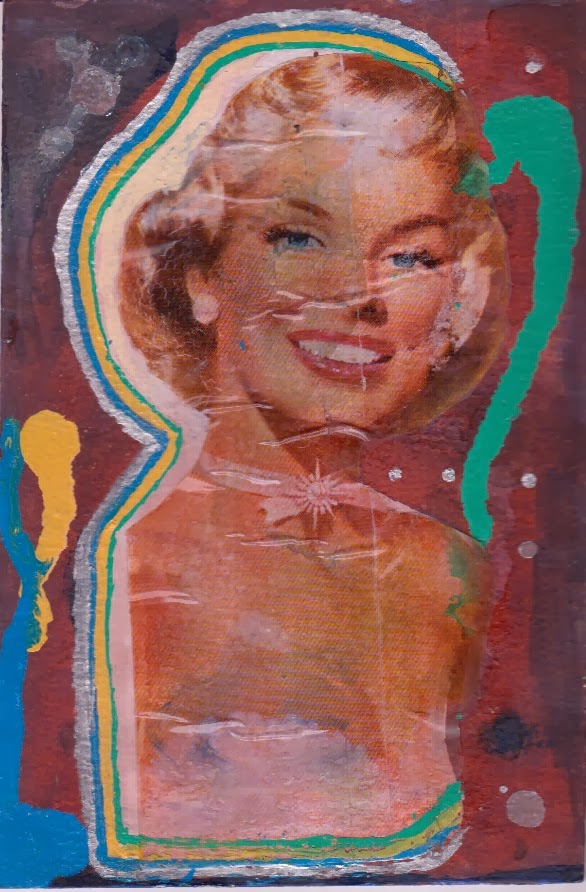
First they learned how to make a tape transfer. This is an awesome process for transferring found images (from magazines) to packing tape, thus resulting in a transparent image to use for collaging onto another surface.

Next, students used 3 or more media to create a background for their work. The objective of this step was to STRETCH AND EXPLORE how different kinds of media can interact with each other. Students could work representational or abstract as they chose. They were to consider color, texture, and layering of different media. Students ENVISIONED how their chosen images might look layered over the background, thus helping them make choices in creating the background.

Thirdly, students altered their tape transfers so that they no longer looked like strips of tape. The objective was to have transparent images to use for their background. They could choose to alter by:
DECONSTRUCTION: cutting up transfer images and reassembling to be unrecognizable as an image, but read as color, texture, line, shape (abstracted)
SELECT: Choosing parts of the image to cut and use (discard rest)
They had to make thoughtful choices about where the images should be glued to incorporate into the background successfully.

Lastly, students worked back into the background using paint, paint markers, & colored sharpies to UNIFY the whole piece. The objective was to make sure that transfer images were fully incorporated into the background as a unified whole work.